Today, we are happy to share a pattern from our shop FOR FREE with our BLOG followers! Just in time for Spring and Summer, we know how those little Waldorf lasies love to change up their wardrobe! So, with that, here is the pattern for our newest pattern, the Patchwork Dress!
A super simple and detailed tutorial for making a darling dress for your Waldorf inspired doll.
Imagine the color combinations! The dress is secured with elastic straps.
This dress, as instructed in this tutorial and using the template... fits a doll with a around the chest circumference of 13 inches.
If you have a larger or a smaller doll, you can easily adjust the template by adding length at the arm pit measurements or the length of the squares, trim, etc.
It's only 6 pieces, front and back, so there is no struggling with arm sleeve attachments, etc.
Patchwork Dress Pattern/Tutorial
Click on the picture directly below this text and print the picture: You want to make sure it is 100% filling the 8.5 X 11 inch page in order for the bodice piece (Upper Left Corner) to be the correct size.
Please note: for the bodice pattern~I used another fabric for another dress, I took pictures of this pattern, and not the one shown in the actual dress picture. Sorry for the confusion, camera issues! (battery was charging for the beginning of the dress making ;)
NOTE: There is a 1/4 inch seam allowance, while cutting out your fabric, if you need more than this, just increase as needed.
Bodice:
Cut 4 total pieces of this bodice piece. Cut around the red lines as shown in the photo below. Make sure the long edge of the template is on the fold.
Lay 2 of the pieces right side up.
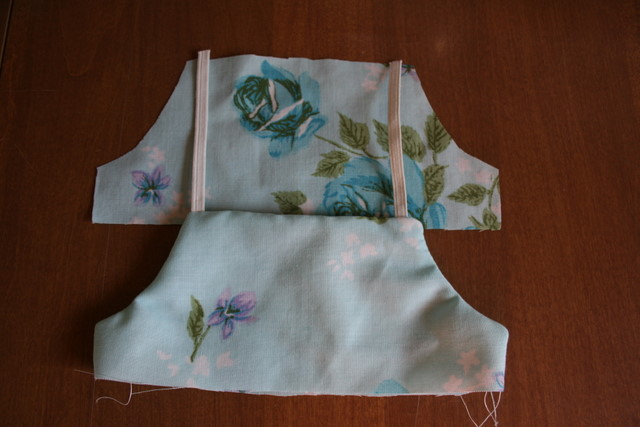
Flip the top piece wrong side up, and place over the other piece as shown.
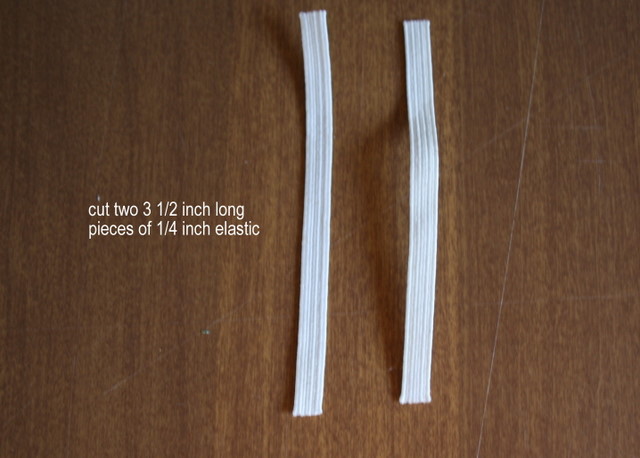
Cut 2 pieces of elastic with measurements shown in photo below.
NOTE! If you like tighter shoulder straps, you can use a 3 inch piece of elastic. Also, you can use plain ribbon here instead of the elastic, this makes for a prettier strap if desired. just remember that the ribbon doesn’t stretch so measure it over the doll’’s shoulders before you sew it into place.
Sandwich the elastic in between the two pieces of fabric (as shown), and pin in place.
Sew around the red outlined sides as shown below.
Turn right side out.
Push insides of all corners out with pencil.
Place the elastic over the top of another RIGHT side out piece of bodice.
Place another piece of bodice over the elastic as you did for the first pieces.
Pin the elastic in place to the piece of bodice.
Sew around the perimeter as you did before.
Turn this piece right side out also, and push corners out again.
SKIRT PATTERN:
Choose 4 separate complimenting fabrics to the color you chose for the bodice
Cut out a 2 ¾ in X 2 ¾ in square (this is the patchwork template)
Now, cut out 12 pieces of each of the 4 fabrics
Place in a diagonal pattern (continuing in the same sequence for each row, as shown here), or you can choose your own pattern if you like.
I have applied a number to each fabric for ease of placement
Do the same for the other side of the skirt, MAKE SURE YOU CONTINUE IN THE SAME SEQUENCE SO YOUR SEAMS MEET UP WITH THE PATTERN CONTINUOUSLY
Sew the first row of 4 together, beginning at the top square, and working down
You are going to do this for each row, making sure you keep them in the same order. Do this for the front and back pieces of the skirt. Make sure you keep the two sides separate though.
Now, iron all of your rows of 4 flat, this will make it easier to sew the rows of 4 together
Sew the rows together, as shown below
Then, iron flat again, and sew another row of 4 to that piece you just sewed
Continue along until you have all rows of 4 sewn to eachother for the front and back pieces
Now, make sure your pieces follow the pattern at the seam, as shown below, this will make for a more continuous look to the dress!
Now, take a piece of one of the fabrics you used on the dress, and fold it in half length wisel. The total dimensions of the folded fabric will be as follows. Please, make this piece as wide as you like!
21 in. length, by 2 in. width
The right side (above) will be the hem of the dress, but since it is already a finished edge, you need no seaming!
Now, gather (make ruffled) the skirt and trim pieces using a basting stitch along the top edge of both of the skirt pieces, and long the unfinished raw edge of each trim piece (make sure you get both pieces of the edge fabric in the basting stitch)
This is how things should look now
Flip the gathered trim up onto the right side of the bottom of the front skirt piece, and spread evenly along, pinning in place.
Sew the two together making sure that the basting stitch is included in the seam allowance so it doesn’t show when the trim is folded back down
See below
See, no basting stitch showing!
Do the same for the back piece, and iron all pieces flat
Now, take the bodice, and lay flat with the skirt in place below
Then, flip the skirt upon the bodice right side, and spread evenly along the bodice edge, pin in place and sew as you did the skirt trim.
Fold back over, iron in place, and repeat the steps above for the other dress pieces
this is how it should look now
Flip the two dress pieces on top of each other, right sides together. you are now going to seam the sides of the dress together to finish the dress. As you are pinning the seam together, make sure that where the seams of the dress pieces are (bodice to skirt, and skirt to trim) meet the twin of it on the other side of the dress for a more finished product.
Sew along the line as shown below
This is how it should look now
Do the same for the other side
Then trim your loose threads, and turn right side out
See...PERFECT SIDE SEAM!!!
Put on the doll from the feet up, and then tuck the arms in. This avoids messing up their lovely hair!
ENJOY~WE WOULD LOVE TO SEE YOUR FINISHED PROJECTS!!!!!
EMAIL ME PICS IF YOU LIKE AT SAMTHEHAMSMOM@GMAIL.COM
OR POST ON FACEBOOK
https://www.facebook.com/pages/Adirondack-Patterns/139921469407356

